Windows, Vents & Doors
Windows
Q: Who made the windows on Airstreams, and how did they vary?
A: The windows were made by Hehr International from almost the start through 1965, and then Corning/Phillips made the operable windows from 1966 on (vintage era).
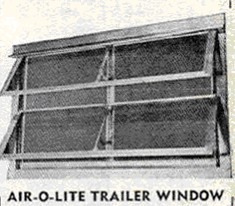
* Years 1947 to ~1949 used a window from Air-O-Lite:
* Years ~1950 to 1951 used an unmarked Hehr with the seal on the openable Window section. The window had a large formed drip-cap over the window.
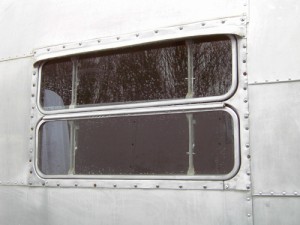
* Years 1952 through 1957 used an unmarked Hehr model called “Standard” with the seal on the frame and stamped aluminum frames. They too had the large drip cap over the window. Crank openers replaced lever type in 1955.
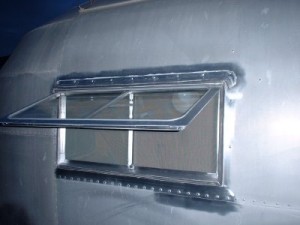
* Years 1958 to 1960 were an intermediate style between the “Standard” and the below mentioned “HallMark”. The window was called the Hehr “Clear-View”. The frame and glass were the new beefier aluminum extrusion frames, but the drip cap was the older large style formed cap. Of course Airstream never did anything linear or cleanly by model year, so there is variability and overlap, with the Clear-View showing up as early as 1956 on some models in the front and back, and never on others.
* Years 1961 through 1965 used “HallMark 12”. The window part number begins with a C 1200. The drip cap is recognizable as being a smaller L shaped extrusion. Openers (operators) varied, with at least 3 different styles being used. Even here, the frames sometimes used a smaller version of the extrusions, varying by window, even on the same trailer.
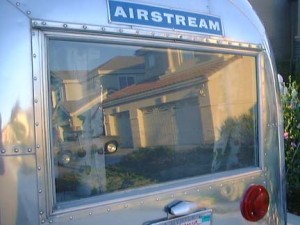
* Years 1966 to 1968 saw the Corning/Phillips windows which reflected the housing style of the time, and were frameless pieces of heat treated curved Corning glass with rounded corners, with hardware attached directly to the windows. They closed against a 360 deg seal and didn’t have drip caps. Later models came with a metal banding to beef up the the flimsy and often delicate design.
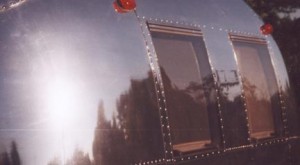
* Years 1969+ saw the return of aluminum framed windows using conventional Corning glass, but with radiused corners.
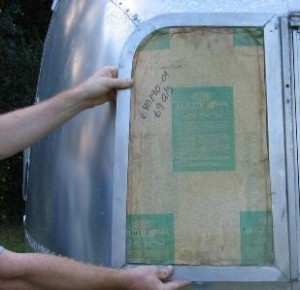
1969 front wrap windows were transitional in that lower corners were still square:
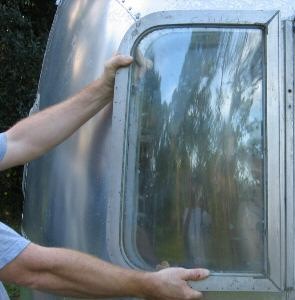
1970+ windows were usually all radiused :
Q: I have a 1962 trailer and the gray strips which hold the window glass in place are falling out. Where can I get new ones?
A: The strip you are referring to are the glass retainer strips or “glazing”, and there were numerous styles over the years. Replacement material are available from Vintage Trailer Supply for the 1950 to 1965 windows, including both sizes of the HallMark windows. The material used on 1966 to 1996 windows is still available from Airstream dealers.
Q: The openers on my 1957 trailer won’t open the window – the handle just spins. What is wrong, and what can I do?
A: Crank openers (operators) first appeared in 1955, and the Hehr style of opener lasted until 1965. It was patterned after casement window openers, but they had a weak link. The gears were cast from soft pot metal, and by turning the wrong way with the window closed, or opened against a resistance, they are easy to strip the teeth off the gears. Replacement is the only option, and generic replacements are available from RV dealers/suppliers, such as Vintage Trailer Supply. See this restoration topic for more info.
Q: The openers on our 1961 trailer are different than those on our 1960 trailer. What gives?
A: Prior to 1955, the openers where simple notched levers. Then things got messy. Hehr operators used varied by year, model, window and factory. 1955 to 1958 used a large cast opener with a single handle crank still available from Blaine. 1959 to 1965 saw many styles of openers with small twist-knob cranks with a complex over the window dual drive mechanism, and ultimately, a smaller single handle crank (the levers and small opener are still available from Vintage Trailer Supply. From 1966 to 1968 they were a ratcheting bar type of mechanism. These are still available from some Airstream dealers.
Q: A window on my late 1960’s trailer has broken, where can I get a replacement?
A: From 1966 to 1968, the windows were made from Corning Glass (frameless). In the past the only solution is to have one made from acrylic or plexiglass, but did not last. Vintage Trailer Supply is now making true safety glass replacement windows for this era.
To replace, access the window hinge from the inside of your coach. You will find some sheet metal screws. Remove those screws and pry open the hinge. Additional installation tips can be found here.
Q: I’m missing a whole window, where can I get a replacement?
A: Unless you can find an exact era and almost the exact model donor, your only course is to have a welding or machine shop fabricate one by building up an equivalent using a lay-up of stock aluminum extrusion pieces per your measurements and using one of your other windows as an example. The butyl bedding tape is available from RV dealers, the single-strength glass from a glass shop, and the glass retainer as noted above. Extrusion for 1969 and later are still available from Airstream dealers.
Here’s an example of a window and frame a “reader” fabricated for their 1950’s restoration using common sheetmetal tools and aluminum sheet and extrusions..
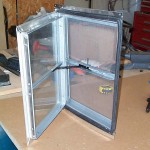
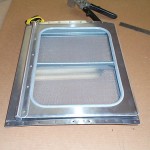
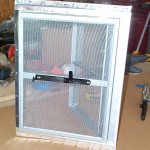
Another ideal alternative is to replace the entire window with an aluminum framed Jalousie Window, as they were an Airstream option from 1951 through 1968. While new US building codes don’t allow them in new construction, they are still used in the tropical areas and in the greenhouse industry. In addition to local window suppliers and greenhouse companies, one source that still has mill finish (aluminum) Jalousies is:
Q: The aluminum drip caps over the windows on my 1950’s trailer are all dented up. What can I do?
A: Replacement drip caps still made, and are available in all the sizes Airstream used from Vintage Trailer Supply for those that are damaged beyond repair. They come in 1 inch increments and are measured from the outside of the flange. Bent existing ones are made from soft aluminum, and can be removed and straightened with smooth flat-nosed (duck bill) pliers. Reattach using Olympic Rivets.
Q: My ‘70’s Airstream has small oval windows above and below the regular windows. They appear to be all foggy. What can be done?
A: These are called “VistaView” window. The vintage VistaView windows were a sealed double pane. The exterior piece of glass had a reflective film applied to its inside surface for privacy and solar/UV reflectivity.
These windows had a tendency to become “un-sealed”, allowing moisture to condense between the two panes of glass. This, in turn, causes the reflective film to fog and deteriorate, and sometimes actually detach from the glass.
There three types of VistaView windows, each with their own method of repair listed below (courtesy of Can-Am-RV).
These repairs can be accomplished without removing the exterior aluminum frame from the trailer, thereby not disturbing the original caulking where the frame fastens to the trailer shell.
Can-Am has the gasket material in two sizes to fill the space in the frame when the inner glass is removed. This material costs $3.00 Canadian or $2.00 U.S. per foot. (parts@can- am-rv.com or 800 709 2931). You need the smaller size for snap ring windows and the larger for windows without the snap ring on the inside.
- 1972 Models:
The first year Double Pane VistaView Windows were available was 1972 and these trailers actually had a plastic inner pane with its own frame. So on a ‘72 you can remove the inner VistaView pane and just clean off the damaged tint on the inside of the outer pane. - Snap ring windows – 1973 & 1974 a few early 1975 Models:
These windows have an aluminum snap ring on the inside which is fairly easy to remove. Once it is out you can pry out the plastic inner pane and start cleaning out the caulking around the edges eventually you will be able to push the outer pane through to the inside (from the outside of the trailer) and remove it completely.
Clean the inside of the frame out completely and wipe it with a solvent so that it is totally clean, make certain that the solvent does not run down the outside of the unit and damage the clear coat. Next clean the glass off completely (you can remove the remains of the old tint with a razor blade) and wipe it off with a solvent such as lacquer thinner as well.
Coat all of the inside surfaces of the window frame with about a 1/8″ thick layer of silver silicone sealant. Take the clean glass and push it into the silicone and then push in the rubber gasket (smaller size). That will take up the extra space in the frame. Then all that is necessary is to clean off the excess silicone on the inside and out and let the remainder harden. The trailer should be kept dry for 6 hours and not be towed for 48 hours.
When it is done with the rubber gasket in place it looks professional, like the factory made it that way. - Non Snap Ring Windows (Glass Inner Pane) – 1975-1984 Models
These windows are the most difficult to do. The inner pane is glass set in the gooiest caulking you have ever seen. First you need to break the inner pane with a hammer and a screw driver near the edge, don’t go through and break the outer pane. The larger chunks of glass in the middle will drop out easily but the small shards of glass stuck in the caulking need to be pulled out one at a time with pliers.
NOTE: WEAR SAFETY GLASSES AND GLOVES. It does not happen very often but every once in a while one of the outer safety glasses explodes and it will throw glass 100′ if it does.
There is a soft plastic molding in the frame that goes from the outside of the outer pane through to the inside of the frame, you will see a lip of it on between the outer frame and the glass. Cut the lip off of the outside by running a sharp utility knife all around the inside edge of the frame. Then you grab the molding on the inside with pliers and pull it out of the frame with the last of the glass pieces and the gooey caulking.
Unlike the earlier snap ring windows, the outer glass will not come out through the inside frame, so you need to clean the glass and the frame with it still in place in the trailer. Clean the inside of the frame out completely and wipe it with a solvent so that it is totally clean, make certain that the solvent does not run down the outside of the unit and damage the clear coat. Next clean the glass off completely (you can remove the remains of the old tint with a razor blade) and wipe it off with a solvent such as lacquer thinner as well.
Coat all of the inside surfaces of the window frame with about a 1/8″ thick layer of silver silicone sealant. Take the clean glass and push it into the silicone and then push in the rubber gasket (larger size) that will take up the extra space in the frame. Then all that is necessary is to clean off the excess silicone on the inside and out and let the remainder harden. The trailer should be kept dry for 6 hours and not be towed for 48 hours. When it is done with the rubber gasket in place it looks professional, like the factory made it that way.
Q: How do I replace the built in screens on the windows of my 1950’s trailer? They aren’t removable.
A: Remove the pop-riveted window opening trim and the opener. Remove the old screen and use as a template for the new screen, allowing 3/8″ extra around for the new crimp. Use heavy gauge galvanized insect screening (Vintage Trailer Supply is one source). Using a good quality screening tool at an angle (looks like a pizza cutter), roll the crimp into the flanges, alternating sides. Fold over any remaining screen and roll it into place. Trim the corners of extra screen. See this restoration topic for more info.
Q: Are the Latch Hooks used on the pre 1966 windows still available?
A: Hehr still makes them and are available from Blaine Window under part # 00821-7-037.
Vents and Access Doors
Q: I’m missing an external roof vent cover. Where can I get a replacement?
A: There were numerous styles used over the years – all of which are no longer available. The openings measured a standard 14 x 14”, all of which were made by Hehr. The late 1940’s “frying pan” version was replaced in the 1950’s with the 2-part baking dish and integral seal, and then again in 1965/1966+ with rounded corner slightly domed “Solardome”, a metal framework with plastic panels. This later versions can have the plastic replaced with acrylic and re-riveted. Earlier versions that require replacement require the installation of a complete vent assy or a “Fantastic Fan” conversion which comes with a very good copy of the original Hehr vent lid in gray thermoform plastic from Vintage Trailer Supply. You can’t tell the difference from the ground, or from the inside if you reuse your existing trim.
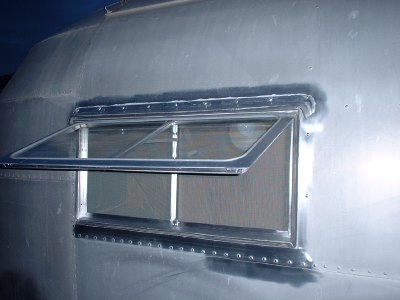
Vintage Trailer Supply continues to look for a source to replace the original plain vent cover.
Q: Are the large domed vent covers available?
A: Up until 1966, the 14″ x 26″ “Astrodome” was a large opaque molded dome shaped vent cover with square corners. Vintage Trailer Supply has made a very nice replacement. The 1966 to 1971 trailers use a similar dome that has rounded corners. Once again, Vintage Trailer Supply has come through, creating an exact replacement.
Q: The twist type openers on our roof vent wont turn –any fix?
A: The LeDeux openers are subject to freezing up if not kept lubricated. Soak the openers in a container or “PB Blaster” or “Kroil” or “Knocker Loose” until they operate. Keep these valuable operators working with annual applications of Lithium grease to the internal risers.
Q: I lost our back Service Panel door from our ’60’s Airstream on the freeway. Where can I get another?
A: These are very scarce. I’m surprised no one has started making them commercially. Right now the only option is to have a sheetmetal shop make one using their shears and pan brake. It involves covering 5 sides of a 1/2″ honeycomb panel with thin aluminum sheet attached to a doubled over piece of aluminum to form the outside. A new handle is attached to the outside sheet before joining the two. A modern RV lock assy (looks just like the old ones) is installed as per the original.
Doors
Q: What is a “Suicide Door”?
A: It is the style of entry door where the door hinges on the left (back) side, allowing the door to open into traffic (suicide in a car) and the slipstream while traveling. This can result in the door slamming back into trailer, causing great damage. Airstream issued a Service Bulletin in the 1960’s to install a small dot on the flange of doorknob equipped doors to prevent false latching. “Lock to the dot” is a mantra of many an Airstreamer.
The reason for the forward facing door is three-fold. If the door was to hinge forward, the door would be sitting out exposed, subject to damage while open, there would be no place to latch it, and it would preclude the use of awning arms.
Q: I need to replace the worn cylinder on my Bargman “refer door handle” entry door lock. Any ideas?
A: The cylinder is identical to what was used by Ford on mid fifties ignition switches, and is known by locksmiths as a “Hurd” cylinder.
Q:My OlD Bargman “refer door handle” entry door lock handle is broken. Are they still made?
A: Airstream used a model L-77, which is vertically mounted. Bargman still makes the L-66, which is horizontally mounted, but parts from it will not fit. All repair parts for the L-77 except for the lock and tumbler are required to be made by a machine shop.
Q: My door is missing the little catch that hold it open. Where can I get a new one?
A: The Bargman Door catch was used from almost the first Airstream trailer on. They are still made to this day by Tekonsha, and are available from Vintage Trailer Supply.
Q: My 1970’s trailer entry door handle is broken. Are these still available?”
A: From the late 1960’s on, Airstream used a Bargman lockset. First the L-100 with round knobs inside & out, replaced in about 1970 by the L-200 with a paddle lever on the inside. The L-100 & L-200 are still available, but be aware that some later trailer models require an extended length yoke bolt because the lock assembly has to clear the internal door structure. This is called a special yoke, and has a Bargman p/n of 682400.
Also, you may need to do some filing on the bolt to get a good fit in the new lockset. The Bargman bolt casting is getting old and is not quite as precise as it once was. One online source is Vintage Trailer Supply.
Q:The heaVy cast handle on my mid-fifties door latch is broken. Any replacement available?
A: A fellow trailer owner, Brian Jenkins, needed one when restoring his trailer, and borrowed one from a friend and had a duplicate mold made and extra castings. They are available from Vintage Trailer Supply. We need more people helping out like that….
Q: I need to replace the weather-stripping on my door. What should I use?
A: They varied greatly over the years, so we’ll fill in the information that is available.
1974+ – Airstream Dealers (used until 1993)
1969-1973 – Airstream Dealers (same material as the ’69 to ’93 windows)
1965-1968 – Automotive black foam rubber weatherstrip will work. “D” shaped automotive foam rubber seals will work . (Vintage Trailer Supply)
1959-1964 – Same as above, but you also need to get a seal for the door in a door, too.
1951-1958 – Rivet-on style. Available from Vintage Trailer Supply.
Q: How do attach the weather-stripping?
A: Use “Super Weatherstrip Adhesive” from Permaseal. Contact cement and the peel and stick tapes fail quickly. All RV places carry it as does Vintage Trailer Supply.






 International Window